...or if I should even post it. I will be baring my soul to my family, friends, crush, strangers, everyone... and letting them in on something I want to keep a secret until it goes away.
For the past 3 years now I have been dealing with a horrible 4 letter word that I have never really dealt with in my life. A-C-N-E. I never really had too much of a problem with my skin before becoming pregnant with my son. Occasional breakouts here and there, but nothing a little persa-gel couldn't clear up. Even when I wasn't being responsible or respectful to my face by not always washing it before bed or wearing a ton of makeup, it was never bad.
Then pregnancy came.
The difference in my skin was insane. It wasn't a breakout, it wasn't a few pimples, it wasn't in a couple spots on my face. It was Cystic Acne. SEVERE Cystic Acne, ALL OVER my face. Being pregnant, there wasn't much I could do as far as treatment went. Couldn't use proactiv, or anything with benzoyl peroxide or salicylic acid because of the possibilities it would effect my pregnancy. I tried natural organic remedies and tea tree oils. Eventually I just came to terms with it and would either stay in hiding or LOAD the makeup on, which only made it worse.
June 6th, 2011. My beautiful baby boy was born and one of the happy thoughts that came along with him was, GREAT maybe now that he is here my hormones will go back to normal and my skin will clear up. I still couldn't do much to treat it because I was nursing, but it did get better for a little while. I had the Mirena IUD placed soon after he was born as recommended by my OB. I was never informed of any side effects that came along with it. I didn't think much of it. It was just a form of birth control. Sometimes I wonder had I not have gotten it if things may be different with my skin today.
The acne came and went. Back and forth. I would have a few months where It was manageable but for the most part it was always there. I started to see a dermatologist. A great one. He said my acne was severe and recommended Accutane. I declined due to the side effects and the cost and asked for an alternative. I was prescribed a gel and some heavy duty antibiotics. Since becoming pregnant and dealing with this I became obsessed about taking care of my skin. Washing it twice daily, moisturizing, treating, ect. After a couple weeks I started taking the pills and using the gel I did start to notice a difference. Nothing jaw dropping but my face was starting to clear up. I had maybe 2 months of decent skin.
Summer of this year. Some stressful events came along. Some court drama, my father died, moving twice, new financial responsibilities. Things started getting wild with my face. It got worse than it has ever been, worse than when I was pregnant. I started doing some research on my birth control after seeing a commercial about a lawsuit for it. One of the MANY serious side effects...ACNE!! It even said Cystic Acne. So panicked, I rushed to the OB and had them remove my Mirena IUD. Thinking its possibly the hormones from that causing it. It was painfully removed and I was placed on a BC pill that is supposed to help with acne. It has been a month now since having it removed and it is not showing any signs of slowing down. Its actually gotten worse. Its to the point now where it is effecting my personality. I no longer want to go out. I cant look at myself in the mirror without makeup on. I am struggling with depression and self confidence problems. I have mastered the art of almost concealing it completely with makeup. I airbrush my face makeup almost daily, For my blog posts and instagram beauty posts I use the right lighting, a great camera, flattering angles and skin softening apps to edit. People see my posts and don't see how I am really feeling, how badly I am hurting inside and out.
The physical pain is something else too! Because it is severe cystic acne (what the dermatologist refers to it as), it is extremely painful. My face swells, throbs and burns when I wash it. So not only does it hurt inside when I look into the mirror and see a leper, but it physically hurts too.
So, last night when I was moping around feeling down and out I decided to do some research on a few skin care companies and send them some emails with my story. Some of them responded and some things may be in the works. I agreed to track my progress and this is just the beginning. The first part of my story. I am not yet ready to share photos with the public yet, you can however get a glimpse of it in my blog post "Beauty Tips for Moms on the Go". But I will start sharing before and progress photos when I start a new treatment. This is also for some people whom I am close with to see, to try and understand why I have been avoiding people. It is something too embarrassing for me to just open up about and tell the world. I want to be able to help people who feel like me. I don't want anyone suffering with bad skin to feel alone. Maybe we can fight this together. Gain some of our confidence back. Who knows.
As soon as I get something set in stone with a skin care line, I will be posting a weekly segment tracking my progress and seeing if I can find the right products for my skin type to fight back and get my face back!
Until then, you can still expect to see beauty related posts on my page as well as giveaways and other fun stuff. Thank you for reading and sticking with me. I appreciate all the love and support I get from my subscribers and followers. It means a lot to me.
Glow on my gorgeous friends, hopefully soon I can get my glow back.
Tuesday, October 15, 2013
Friday, October 11, 2013
FALL BEAUTY ON A BUDGET
FALL BEAUTY ON A BUDGET
Fall is here, Fall is here, its the best time of the year!!!! It is time for darker, sultry makeup. Smoked eyes or deep gem colored lips. This post is inspired by a look that was sent to me from my best friend (HI STEPH). Very glam and very fall. I will go over all products used and a tutorial on the eye makeup as well. The best part about this post is that everything I used was purchased from TARGET! So if you are on a budget but still want to look fabulous this fall then READ ON!
FULL LOOK


For this look I went FULL GLAM! Meaning, full coverage, played up eyes, and a super trendy dark purple lip. Every product used was purchased from Target.
FACE : CoverGirl Stay Fabulous Foundation
BLUSH & EYES : PIXI Soft Focus Fresh Palette
BROWS : PIXI Natural Brow Duo
LASHES : Sonia Kashuk Full Drama Lashes
LIPS : CoverGirl Lip Duo in 815 "Flashy"
For the face start out with a clean canvas. CoverGirl Stay Fabulous 3 in 1 Foundation is perfect for that full coverage matte look. It lasts all day and all night with no touching up, it wont budge and its affordable. This is probably my GO TO foundation as of right now. I use shade number 820. For the contour I used the darkest color blusher in the Pixi Palette. Then with a lighter pink go over the apples of your checks lightly. The main focus being the contour. With the lightest blush color, I placed that in my highlight zones. On top of the cheekbone under the eye, bridge of my nose, cupids bow, and chin. Below is an in depth tutorial on how I accomplished the eyes. ENJOY!
FALL EYES

1. Start with a clean canvas
2. Using a white base (NYX Jumbo Pencil in Milk) Apply to your lids, in the inner corners and around the lower tear duct area. Then taking the White shadow from the palette place it over the white base to set it. Apply it in a patting motion for better color payoff.
3. Using a Fluffy Blending Brush take a very light matte beige color and apply it in a windshield wiper motion above your crease. This is what's called your transition color. Make sure it is blended well. WHEN IN DOUBT, BLEND IT OUT!
4. With a Pencil Brush dab it in a dark brown color. I used the very last shadow color in the palette. Then place it in the crease using the same motion as step 3. Do not go any higher than your transition color.
5. BLEND BLEND BLEND BLEND! Use that same fluffy blending brush from step 3.
6. Using the excess of what is left on your pencil brush I ran it under my lower last line ONLY in the center of the eyes. Don't drag it into the inner or outer corners. Keep it in the center.
7. Using a Black Kohl Pencil I made a very thin liner line along the top lash line and tight-lined underneath the lashes. Tight-lining is totally optional. I do it for every look and personally love it. It makes your lashes appear thicker and fuller.
8. Lastly add your favorite lashes. Mine are the Sonia Kashuk Full Drama Lashes. They are GORGEOUS! So full and luxurious.
That completes the eyes! Let me know in the comments if you have any other questions regarding this.
LIPS

I love how pigmented and creamy this lipstick is by CoverGirl. Its is the BLASTlipstick duo in number 815 "Flashy". This is the perfect color for fall. It is a warm color that looks great on all skin tones. To apply it I just put it on from the tube, then taking a very small lip brush I lined my lips with the lipstick for a clean precise application.
That sums up this look. Again, all products used were purchased from Target. You can shop for them online at Target.com or head to your neighborhood Target to pick up what you need. If you have any questions regarding this post please feel free to leave them in the comments and I will get back to you. Also, let me know if you have any requests or would like to see more reviews, tutorials, ect. Thanks so much! I hope you loved this post as much as I loved creating it! Love you and GLOW ON!
HAPPY FALL!!!
Wednesday, October 9, 2013
Beauty Tips for Moms on the GO!
As a mother of a wild and fun 2 year old boy, I have come to terms with the fact that I don't have an additional two hours laying around taking my sweet time perfecting my appearance. So I have tried mastering the art of making myself look presentable in a matter of minutes. Here are some tips that I have for you and I hope that they are of some use.
1. Focus on the areas that need the most help. If you have great skin, than skip foundation. If you have great brows than you don't need to fill them in. If you have a naturally beautiful lip color then just throw on some chapstick. If you only have a few blemishes then put a dot of concealer on them and blend it. When you only have a few minutes to get ready, don't worry about doing a full face of makeup. Only go after the areas that bother you.
2. AERESOL anything is OUR FRIEND!!! I am a HUGE fan of aerosol makeup. Ever since having my son I have suffered with acne. (Thanks lil dude!) I have always loved the look of a flawless airbrush finished makeup. I even have a few airbrush makeup kits. (that I now have no time to use) After roaming around killing time at the mall inside of Sephora I came across DIOR Airflash and bought it. It is a bit pricey but I have drugstore alternatives for you. All I can say is WOW! It took less than 30 seconds to get a full coverage flawless look without having to clean up any airbrushing equipment. Every last blemish on my face was concealed and covered. It makes me feel like a million bucks. I am also a huge advocate for Sally Hansens Airbrush legs which you can use over your whole body. Sally Hansen also has aerosol makeup however I have yet to try it. I'm sure it is just as good as the airbrush legs.

3. If you have sparse brows, over tweezed brows, or just plain funny brows then listen up. I feel like the brows are one of the most important features on our face. Imagine a world with no eye brows. Funny, right? There are a few products out that I love right now, but we are talking about speed here. I would have to recommend Anastasia Brow Wiz. It is dual sided. One side is the pencil and the other side is a spooley. I've got this down to a science and can fill my sparse brows in, in about 2 minutes. How I fill my brows in is simple. Just outline your brow shape with the pencil. Add additional pencil to any super sparse areas and then run the spooley through your brows to blend it all and get rid of any harsh lines.

4. MASCARA! I cant live without it. If you are lucky enough to have thick and dark lashes then skip it. If you are cursed with light and barely there lashes like me, I recommend Loreal Telescopic mascara. I have it in both brown and black and love how both look. It goes on easily with no clumping and gives you gorgeous natural looking lashes.
5. Add a touch of color to your cheeks, Using either a bronzer or your fave blush. Just so you don't look like a zombie. Takes less than a few seconds, A little color goes a long way!
6. Lastly, if you have super pale lips like I do and need to bring some life to them without looking overly done up some of my favorite colored lip balms are the Maybelline Baby Lips. They hydrate your lips so well while giving them a tint of natural looking color!
I think that sums it up. The quickest makeup tips I have for us moms on the run. It typically takes me about 15 minutes to get ready if I have somewhere I need to be and a difficult toddler who wont let me get ready. Let me know if you have any questions or requests that I can help you with. Hope you enjoyed.

Tuesday, May 21, 2013
The Very First BATTLE OF THE BRANDS!!!
Hi Beauties!!
It is with great pleasure to be announcing that I will be doing something fun, new and exciting. I will try to do this weekly or bi-weekly. I will be taking two similar products from competing companies and throwing them in the ring to battle it out and see who comes out victorious.
So without further adieu I proudly present the first ever iGlowBeauty BATTLE OF THE BRANDS!!! Featuring Dinair Airbrush Makeup and Belletto Studios Airbrush Makeup. Both companies kindly sent me an airbrush kit to test out and review and they loved my idea of this whole concept. I will list pros and cons for each company. Post photos of how the makeup came out and then will decide which product I liked the best.
HERE WE GO!
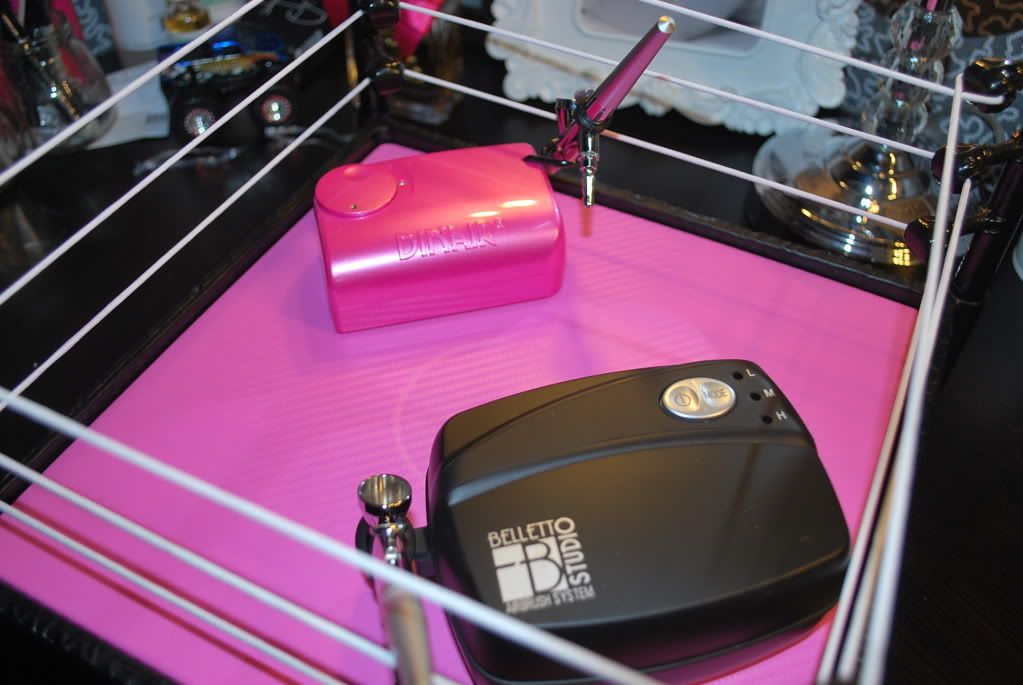

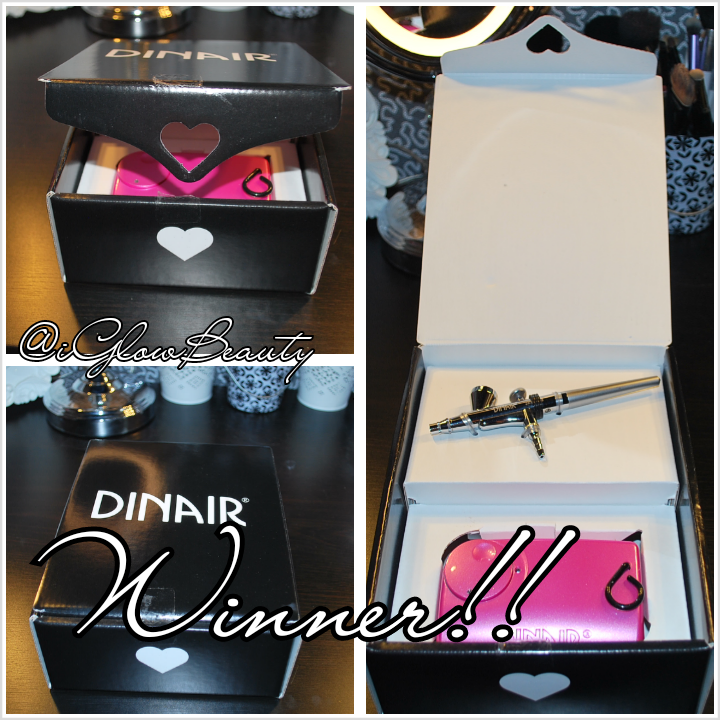
Dinair's packaging is much more girly. But it is intended just for the initial delivery of the product, It will not last long if you are trying to store it while it is not in use. Which is fine because the system itself is beautiful and looks great on any vanity. Here are some photos of Dinairs packaging.

So as far as packaging goes Belletto Studios is a little more convenient but Dinairs is super fun and flirty! Both get A's in this department.


The Belletto Studio Skin Secrets Kit comes with the airbrush system, Four foundations, a blush, and lustre drops for that dewy finish everyone loves so much. It also comes with an instructional DVD. So the Dinair you definitely get more for your money. Dinair also has specials running all the time where you get double the amount of foundation or an eye shadow collection with your purchase. So in this department Dinair takes the cake.


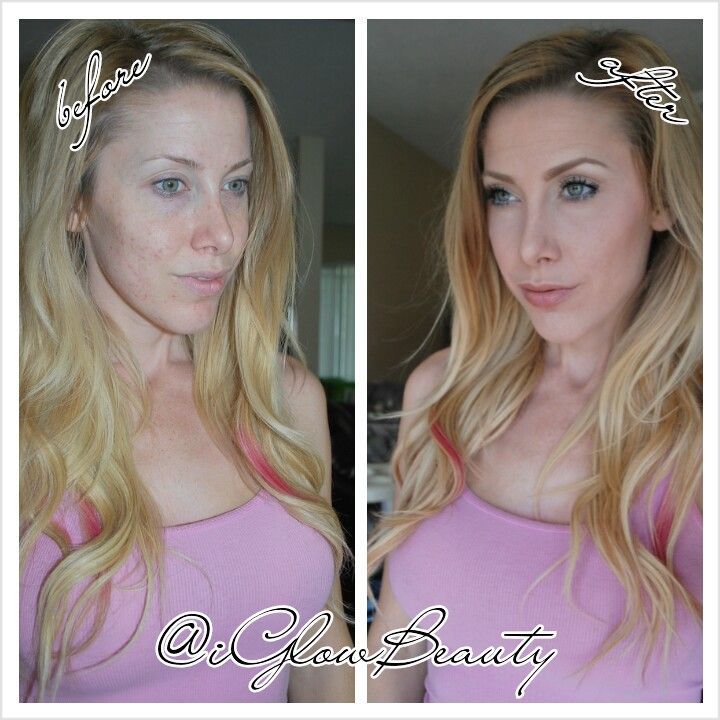 Here is a before and after using the Belletto Airbrush makeup. I used the foundations in shade F1 and F2 mixed together. Great coverage. Again the only thing I didn't like is the wrinkles around my eyes were still visible but you cant really tell in this photo.
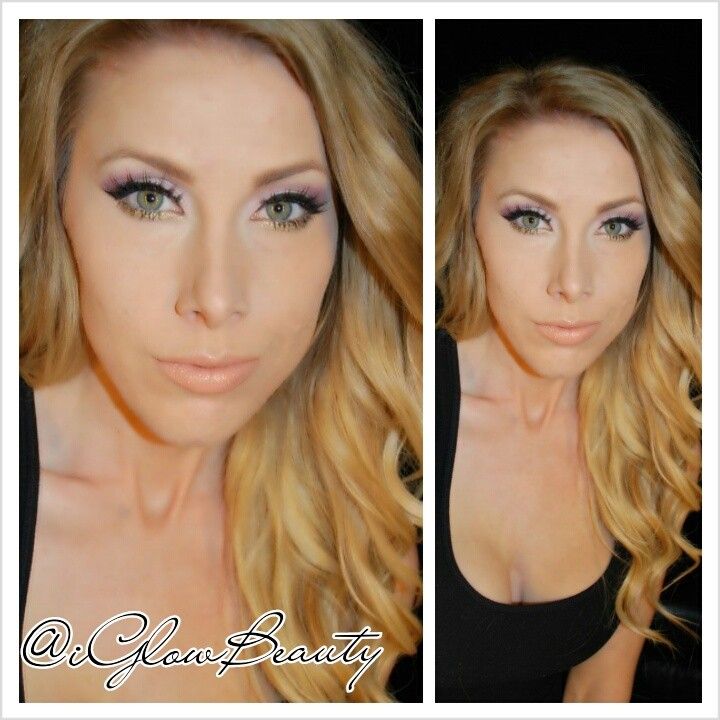 And here is a shot of a full face application with my Dinair. Not only did I airbrush my face but I did my brows, shadow, liner and lips as well! Dinairs makeup goes on effortlessly and covers EVERYTHING! It does not sink into any wrinkles or fine lines and lasts all day long. So the winner for this category has to be DINAIR!!
For the Dinair you can visit
www.airbrushmakeup.com
For the Belletto Studio you can visit
www.BellettoStudio.com
It is with great pleasure to be announcing that I will be doing something fun, new and exciting. I will try to do this weekly or bi-weekly. I will be taking two similar products from competing companies and throwing them in the ring to battle it out and see who comes out victorious.
So without further adieu I proudly present the first ever iGlowBeauty BATTLE OF THE BRANDS!!! Featuring Dinair Airbrush Makeup and Belletto Studios Airbrush Makeup. Both companies kindly sent me an airbrush kit to test out and review and they loved my idea of this whole concept. I will list pros and cons for each company. Post photos of how the makeup came out and then will decide which product I liked the best.
HERE WE GO!
DINAIR VS BELLETTO
ROUND ONE
PACKAGING
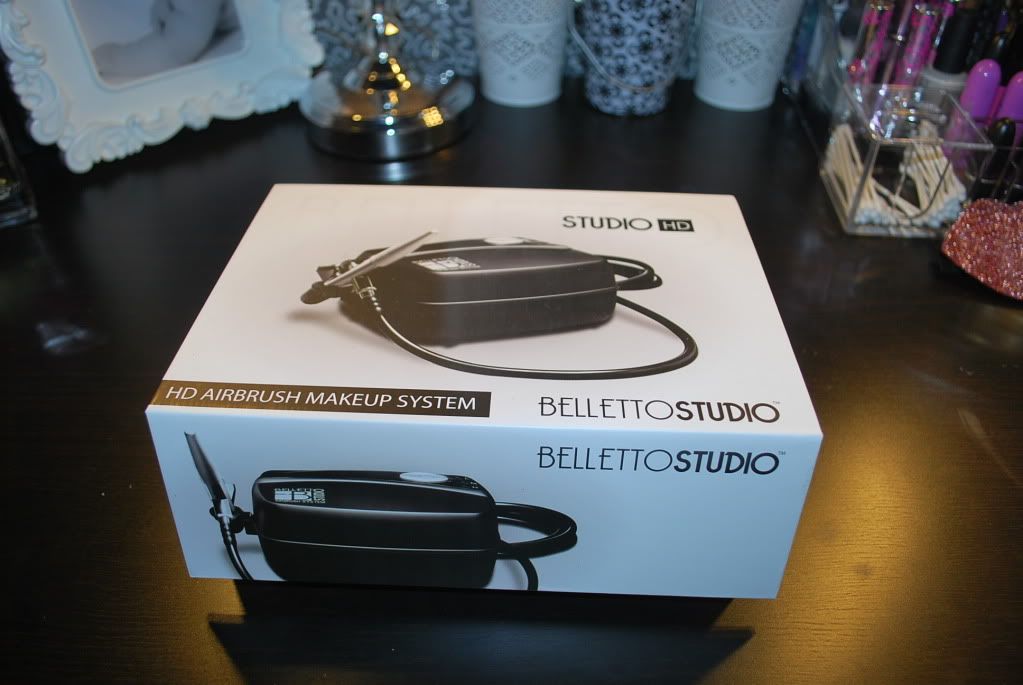
As far as packaging goes both products came in all around nice packages. Both were in boxes that were cute and represent the company well. I like that Belletto had a magnetic opening and a plastic holding case for the system so that you could hold on to it and store it somewhere while you weren't using it. Here are a few images showing how the package looks.
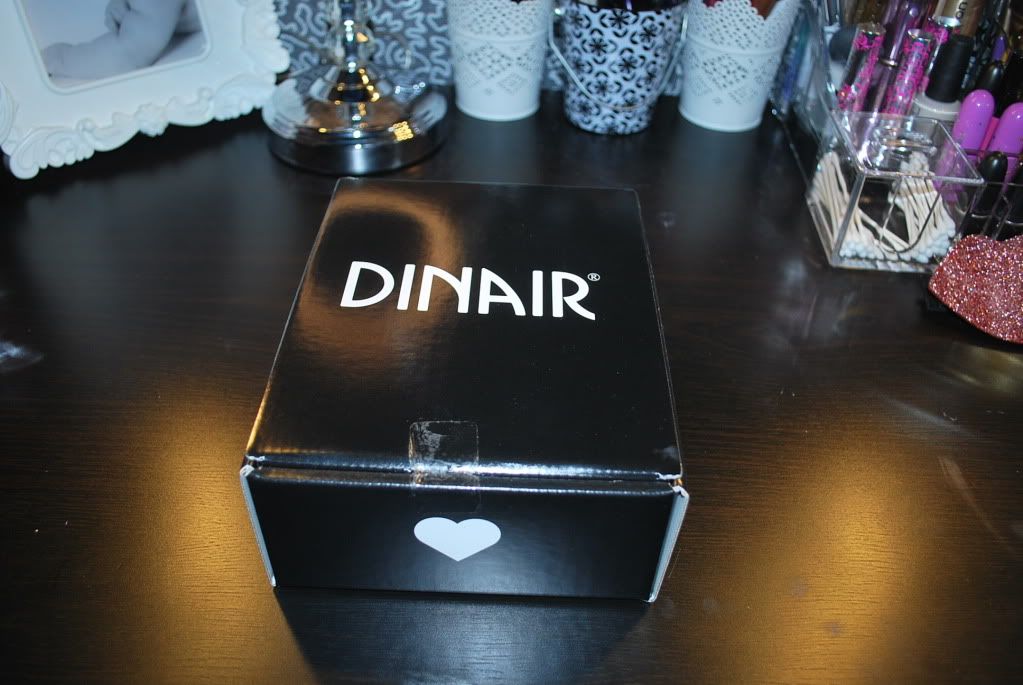
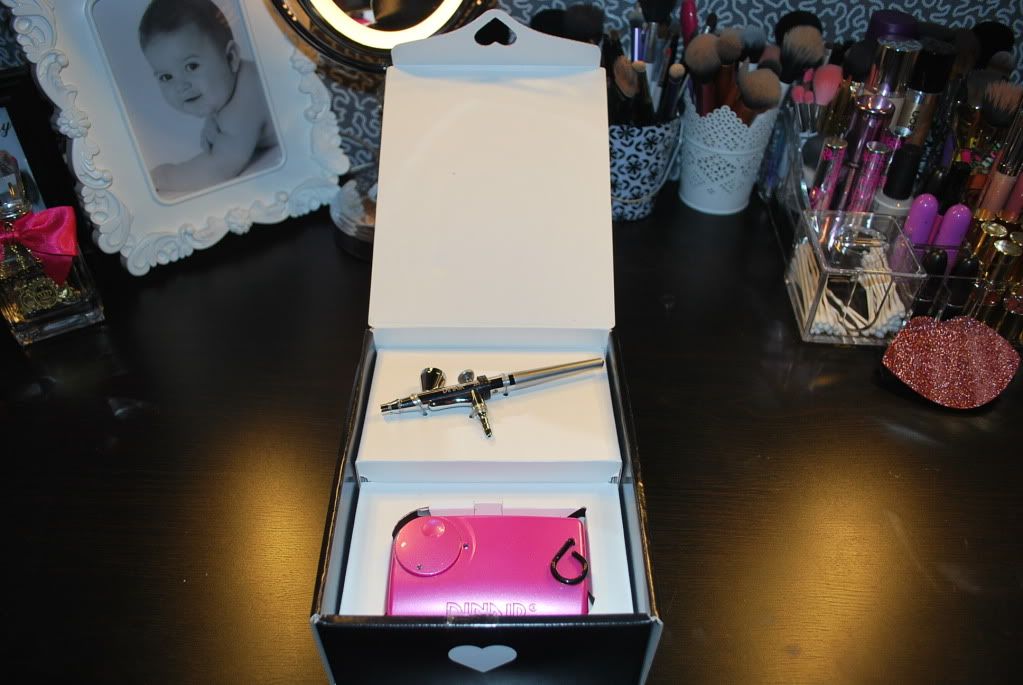
Dinair's packaging is much more girly. But it is intended just for the initial delivery of the product, It will not last long if you are trying to store it while it is not in use. Which is fine because the system itself is beautiful and looks great on any vanity. Here are some photos of Dinairs packaging.
So as far as packaging goes Belletto Studios is a little more convenient but Dinairs is super fun and flirty! Both get A's in this department.
ROUND 2
CONTENTS
Dinairs Personal Pro Kit comes with your airbrush system, 4 foundation colors, 4 other colors that can be used as face or eye colors, a concealer, a moist and dewy finishing spray and some of their facial tanning solution to try. I love that you can chose the color of your compressor and the size perfect. It is very compact and beautifully designed. It also comes with an instructional dvd and brow stencils which are not pictured above. They are also kind enough to offer a $5 gift card towards your next purchase and a free skype lesson to make sure you are properly using your airbrush. Their customer service is amazing. Truly a great company.The Belletto Studio Skin Secrets Kit comes with the airbrush system, Four foundations, a blush, and lustre drops for that dewy finish everyone loves so much. It also comes with an instructional DVD. So the Dinair you definitely get more for your money. Dinair also has specials running all the time where you get double the amount of foundation or an eye shadow collection with your purchase. So in this department Dinair takes the cake.
ROUND 3
PRICE
Dinair ~ $199
Belletto Studio ~ $379.95
So clearly the Dinair is the better deal and you do get a lot more for your money.
ROUND 4
COMPRESSORS
I am definitely going to have to go with Dinairs compressor here, Not only is it more compact and you can chose whichever color you would like but it is more quiet and has a dial for your airflow settings whereas Belletto Studio has only 3 airflow settings.

ROUND 5
MAKEUP APPLICATION
Obviously both airbrushes leave you looking flawless and airbrushed however I did like Dinairs Makeup a little bit better than the Belletto makeup. I felt that the Belletto foundation seeped into my fine lines especially under my eyes whereas Dinairs did not crease at all in any of my wrinkles. Dont get me wrong I do like Belletto Studios products I just felt that they were slightly heavier than Dinair. Also there is a MUCH larger color selection with Dinair and you can use all makeup as eyeshadow or lip color or even color your hair. So there are many more uses for Dinair than Belletto.
Here are a few photos of my airbrushed makeup.
So after researching, reviewing and trying out both products for a little over a month I have to say that I did come to a conclusion as to who the winner is in my opinion. Before I do that, I will give you guys the links to both companies if you would like to do a little researching yourself before you decide on which one you would want to buy.For the Dinair you can visit
www.airbrushmakeup.com
For the Belletto Studio you can visit
www.BellettoStudio.com
THE WINNER BY UNANIMOUS DECISION IS...
DINAIR!!!!!
I really do like both companies and they do offer everything that they promise but I do have to say that Dinair does go that extra mile and you do get a lot for the price you are spending and its still quite a bit less expensive than the Belletto Studio Airbrush Kit.
I do want to thank both companies for wanting to participate in this and if you guys have any suggestions on what you would like to see on the next BATTLE OF THE BRANDS please let me know! Also if you own a cosmetic or beauty company and you have a product you would like to see battle it out please email me at iGlowBeautyMUA@gmail.com (serious inquiries only please.)
Thanks again for reading. I would love to get an actual website up and running soon as well as a you tube channel. Would any of you be interested in seeing that?? Let me know.
GLOW ON MY LOVES!!!
Thursday, May 2, 2013
Get Struck by Lightening. Whitening Lightening Review!!
Hi Loves!
Recently I received a package from Whitening Lightning to try out their Dial-a-smile and share the results with my subscribers.
I have pretty sensitive teeth so I was questioning whether or not this would be better or worse than any other brand like white strips or going and having your teeth whitened by a professional.
Anyways, the package comes with a cardboard dial with different shades to determine your starting and finished color. It also comes with a syringe of the gel, a dispensing cup, vitamin E cotton swabs for your gums and lips, teeth wipes, an applicator brush for the gel, and the LED light. There is enough for 3 treatments.
It's very easy to use. I love that the light can just be placed in your mouth and can be used hands free. It comes with easy to follow directions. All you need to do is wipe your teeth with the wipes, rub the vitamin e swabs on your gums and teeth, apply a generous coat of the gel on your teeth and put the light in for 20 minutes then brush off the gel when you're done. Easy Peasy.
Now for my results. Before I started I was a 7, after my first treatment I went to a 4. That's 3 shades in 20 minutes. The next day I used it again. I went to a shade 2. I tried one last time to try and get them to a 1, but it stayed at a shade 2. Still pretty impressive.
This kit retails for $399 and it is totally worth it at that. But Whitening Lightning is being kind enough to offer this kit to my subscribers for only $69. So you're saving $330. It's pretty incredible. They must be doing something right if they can offer this price to so many of you. If you purchase make sure to use my coupon code "iglowkit" at checkout.
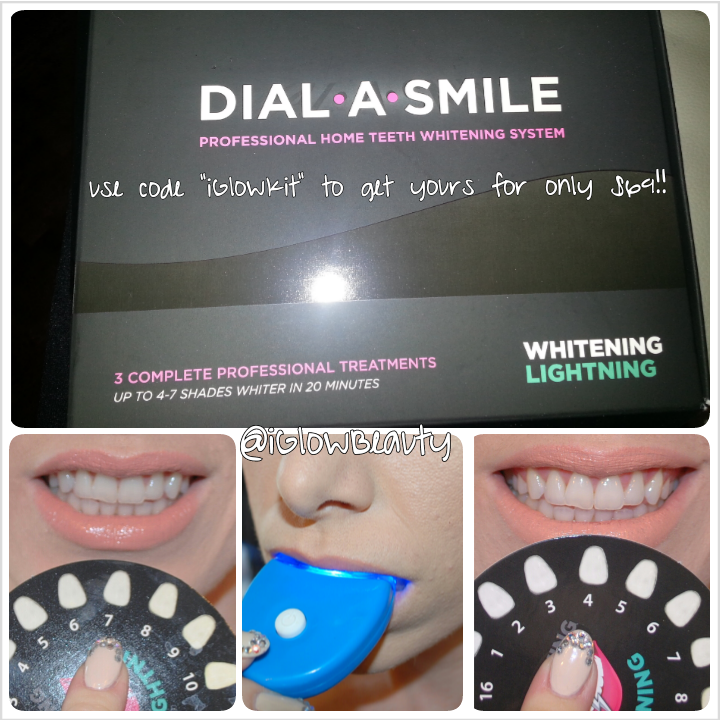
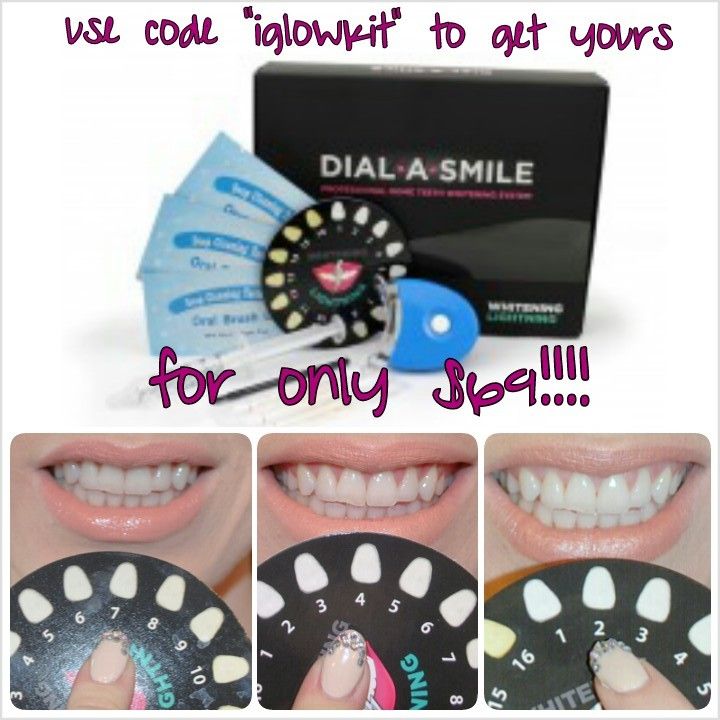
Here's where you can get it!! http://www.whiteninglightning.com/dial-a-smile-professional-whitening-kit/
Glow on and get glowing teeth too!! ;)
Thursday, April 25, 2013
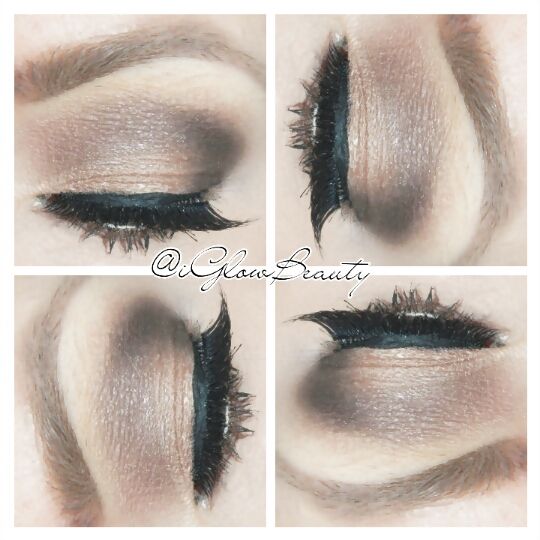
Go Nude.
A staple for any lady has to be a nude or natural looking eye. It is a timeless classic look that can be worn with any outfit at anytime for any occasion. And for those of you who find the natural look to be a bit boring, I will post a few fun tricks to spruce up and add some drama to a nude eye look. Enjoy ladies and shed that smokey cover up every now and again and get those ojos naked.
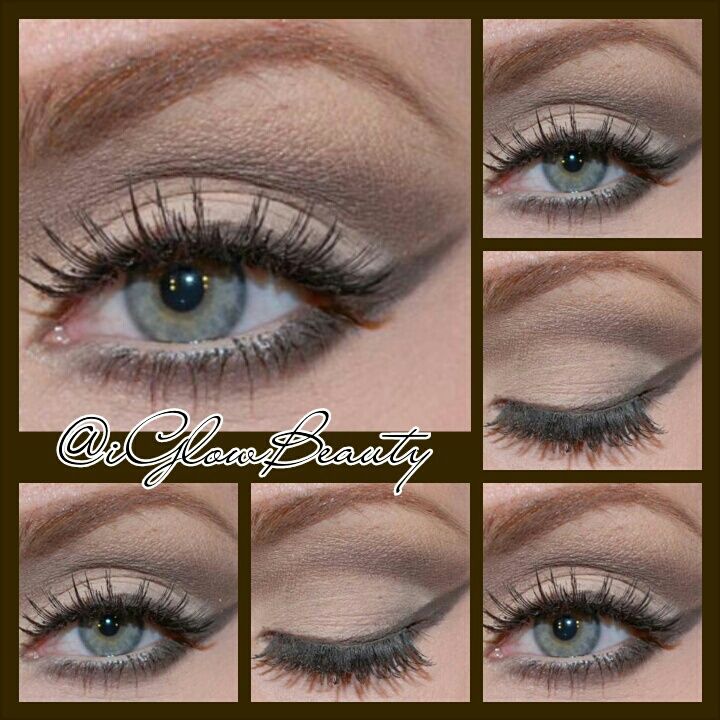
Here is a step by step on how to create the perfect soft natural looking eye.

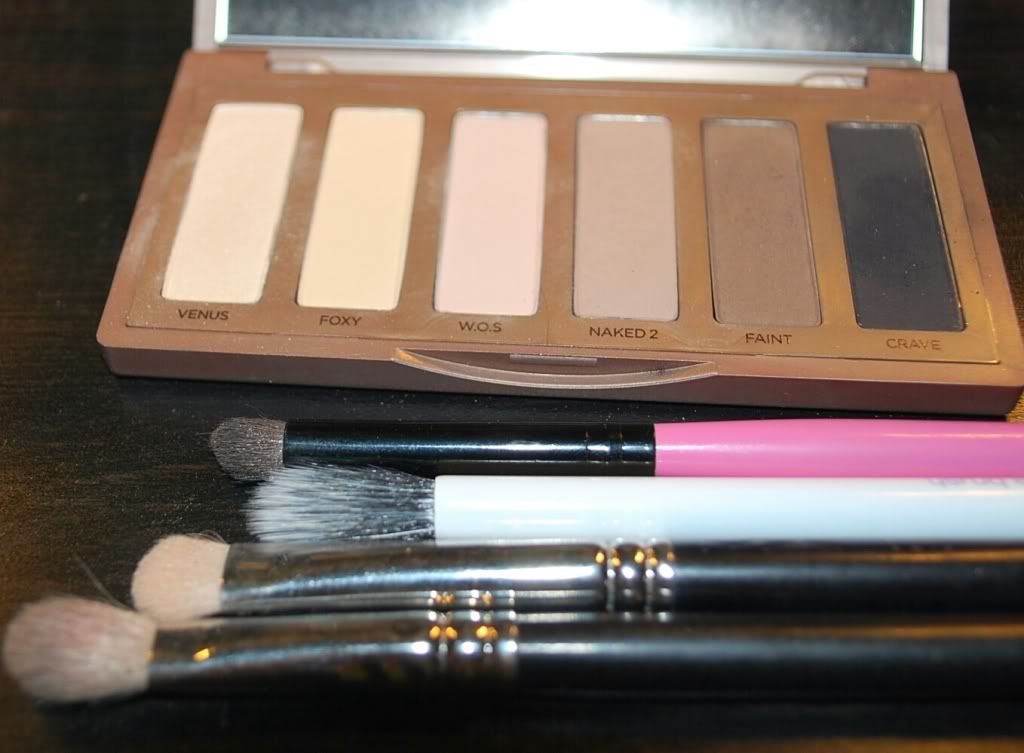
For this look I used The Urban Decay Naked Basics Palette, NYC liquid liner, Eyeko Mascara and Sonia Kashuk Full Glam Lashes.
1. You always want to start with a primed lid. I use Urban Decay Primer Potion in original. I also take NYX jumbo pencil in milk and use it on the inner corners of my eyes to make them appear brighter and bigger.
2. Taking a fluffy blending brush, I used MAC 217 brush, swipe the color Naked 2 in the palette and apply it to the crease of your eye in a windshield wiper motion. this will be your transition color.
3. This is how your eye should look after step 2.
4. Take a pencil brush. I used an auraline brush and dab it lightly in the color Faint. doing the similar motion apply this color right below the lighter color you applied.
5. Taking your Blending brush again blend everything together so its not harsh looking. It should transition smoothly from the dark to light color.
6. This is what you should have so far.
7. Taking a flat shadow brush pack on the color Venus and pat it all over your lid. Smooth it over once you have the color payoff you want.
8. Take Venus again and place it on your browbone to highlight. it gives your brows the perfect arched and raised look.
9. Taking your pencil brush again lightly dab the color Crave and apply it lightly to the outer corners of your eyes.
10. Should look something like this.
11. With a clean blending brush, I used the Real Techniques duo fiber to blend the dark colors so there are no harsh lines. blend blend blend.
12. This is what you should have so far.
13. With whatever product is left on the pencil brush, run it along your lower lash line. To make your eyes appear larger you can line the lower water line with a white liner. If you like a more sultry look you can go with a dark liner.
14. Now liquid liner time. For me Ive found its easier to start at the wing and work my way in. I use NYC liquid liner and line the brush up against my lower lash line outer corner and flick it towards the end of my brow.
15. Now go to the inner corners and line them stopping in the middle of the lid.
16. From the end of the wing drag the brush down and attach it to where you stopped in step 15. Making a triangle.
17. Fill in the triangle.
18. Apply your favorite mascara and false lashes. I used Eyeko Skinny Mini Mascara and Sonia Kashuk Full Glam Lashes.

There are soooo many beautiful ways to wear this look. Literally thousands. You can tone it down with non winged liner or no liner at all. Like these looks.
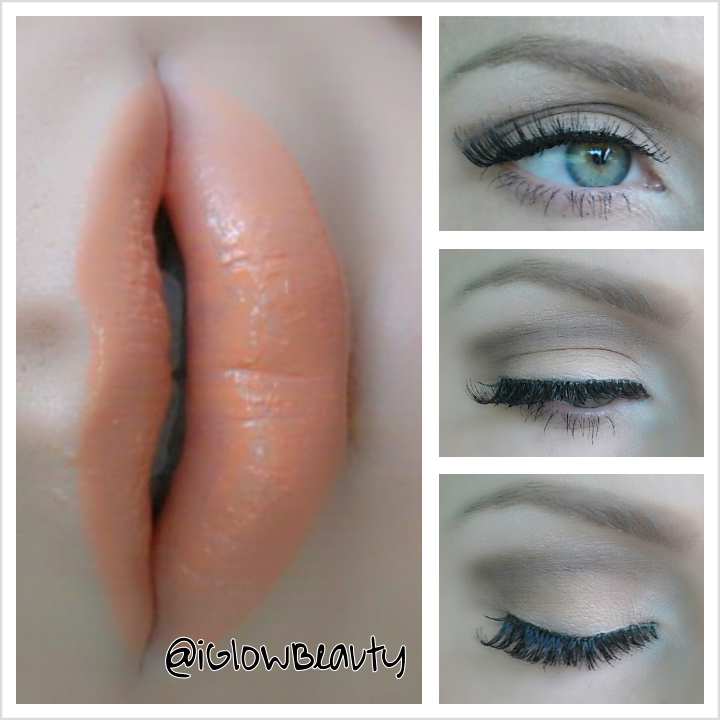
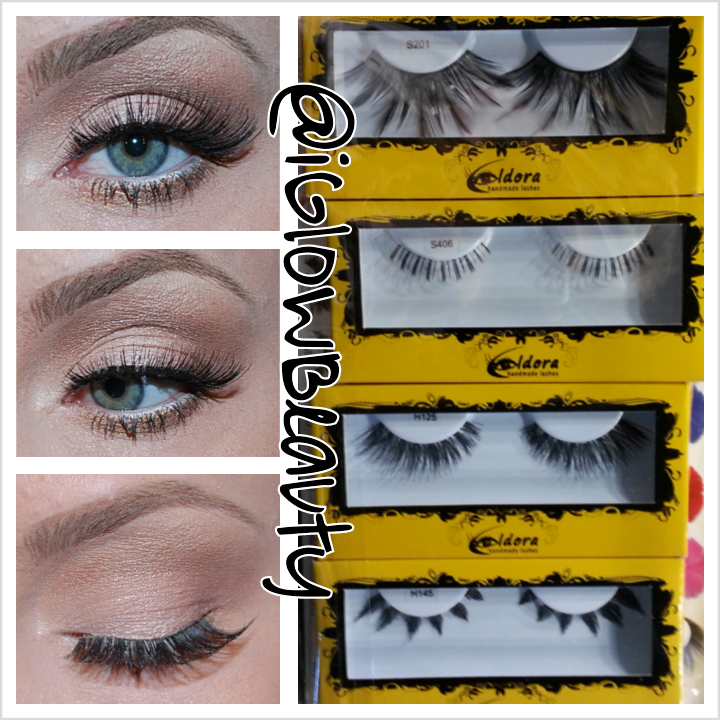
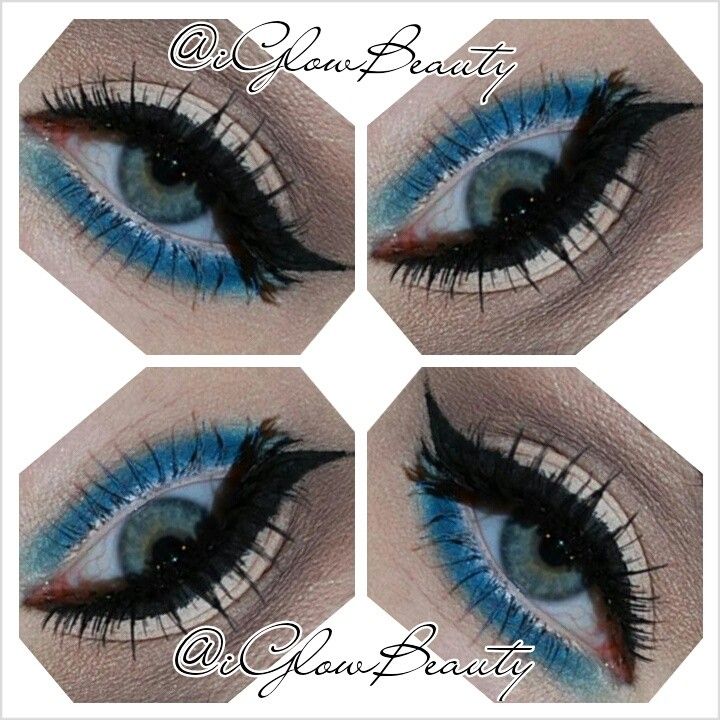
If you are into colors you can always add a pop of color to the lower lash line. For a softer look use pastels and for a bold edgy look go with bright or bold colors. Here are some examples.


And there you have it. Here are my favorite ways to wear a naked and natural looking eye. Thank you for reading. I would love to see your work.
Don't forget to subscribe my loves.
Glow on, Beauties.
Here is a step by step on how to create the perfect soft natural looking eye.
For this look I used The Urban Decay Naked Basics Palette, NYC liquid liner, Eyeko Mascara and Sonia Kashuk Full Glam Lashes.
1. You always want to start with a primed lid. I use Urban Decay Primer Potion in original. I also take NYX jumbo pencil in milk and use it on the inner corners of my eyes to make them appear brighter and bigger.
2. Taking a fluffy blending brush, I used MAC 217 brush, swipe the color Naked 2 in the palette and apply it to the crease of your eye in a windshield wiper motion. this will be your transition color.
3. This is how your eye should look after step 2.
4. Take a pencil brush. I used an auraline brush and dab it lightly in the color Faint. doing the similar motion apply this color right below the lighter color you applied.
5. Taking your Blending brush again blend everything together so its not harsh looking. It should transition smoothly from the dark to light color.
6. This is what you should have so far.
7. Taking a flat shadow brush pack on the color Venus and pat it all over your lid. Smooth it over once you have the color payoff you want.
8. Take Venus again and place it on your browbone to highlight. it gives your brows the perfect arched and raised look.
9. Taking your pencil brush again lightly dab the color Crave and apply it lightly to the outer corners of your eyes.
10. Should look something like this.
11. With a clean blending brush, I used the Real Techniques duo fiber to blend the dark colors so there are no harsh lines. blend blend blend.
12. This is what you should have so far.
13. With whatever product is left on the pencil brush, run it along your lower lash line. To make your eyes appear larger you can line the lower water line with a white liner. If you like a more sultry look you can go with a dark liner.
14. Now liquid liner time. For me Ive found its easier to start at the wing and work my way in. I use NYC liquid liner and line the brush up against my lower lash line outer corner and flick it towards the end of my brow.
15. Now go to the inner corners and line them stopping in the middle of the lid.
16. From the end of the wing drag the brush down and attach it to where you stopped in step 15. Making a triangle.
17. Fill in the triangle.
18. Apply your favorite mascara and false lashes. I used Eyeko Skinny Mini Mascara and Sonia Kashuk Full Glam Lashes.
There are soooo many beautiful ways to wear this look. Literally thousands. You can tone it down with non winged liner or no liner at all. Like these looks.
If you are into colors you can always add a pop of color to the lower lash line. For a softer look use pastels and for a bold edgy look go with bright or bold colors. Here are some examples.
And there you have it. Here are my favorite ways to wear a naked and natural looking eye. Thank you for reading. I would love to see your work.
Don't forget to subscribe my loves.
Glow on, Beauties.
Wednesday, April 17, 2013
Haute Lashes Review!!
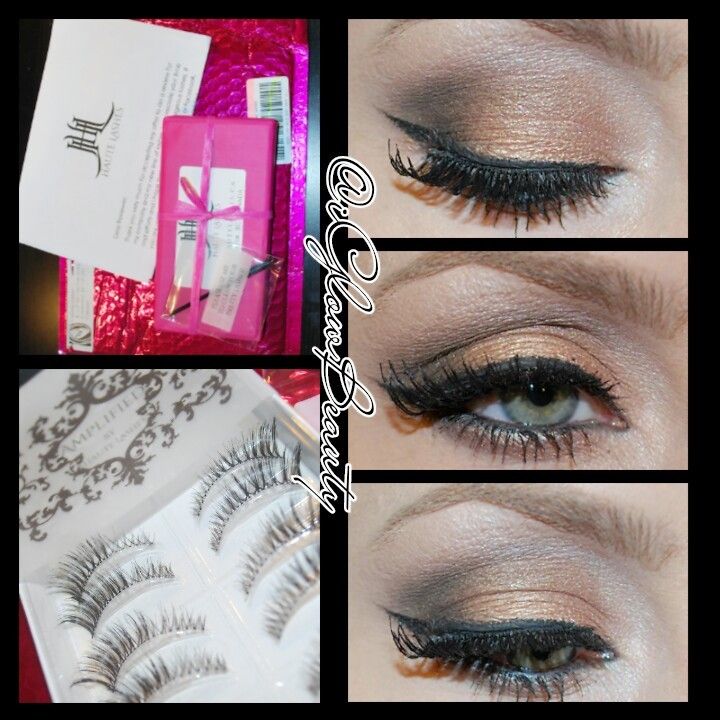
Alright, So it's time for my first product review of many to come. Today I will tell you how I feel about Haute Lashes.
I received these beauties in the mail a couple weeks ago. Initially, I thought the packaging was really cute. However, after about a week the top of the case started to fall apart and the label is almost completely peeled off.
The lashes I got are from the Amplified Collection in number 19. The website has a ton of different styles to choose from. I liked these because they mix natural with dramatic. The inner corners are short and the outer corners are super long and curled.
They fit perfectly onto my eyes so I did not have to cut them. They are relatively comfortable and did not poke or bother my eyes. I like that they are flexible. I hate stiff bands.
The quality is definitely good for the price. You can wear them a few times before they fall apart. All in all I love these lashes. You can purchase a box of 10 lashes for just $25. Place your order now at www.hautelashes.ca
Wednesday, April 10, 2013
Brow Chicka Brow Brow. Brow Tutorial!
In my opinion Brows are one of the most important features on our faces. Here is a quick step by step on how I fill in my brows. For my brows I use all Anastasia Beverly Hills products. You can get these at any Ulta or Sephora, or her website www.anastasia.net

The products I use everyday are Anastasia Brow Wiz in Ash Blonde, Anastasia Beauty Express Brow Kit in Blonde and Brow Tint in Blonde.
2) I start at the tail of my brow working my way in, you want the tail to be darkest getting lighter as you work your way in. I use light hair like strokes. Then when I get to the front of my brows I just outline them.
3) Here's what they should like.
4) Take the spooly again and run it through your brows to blend the pencil in with your brow hairs. It will remove ghe harsh outlined look.
5) Using the lighter color powder in my Beauty Express kit, I blend it in the front of my brows so there are no visible sparse spots, then take the darker color for the ends of your brows.
6) To set all of this beautiful work so it doesn't stray all day, I take the brow tint in Blonde and run in through the entire brow. it gives it that clean groomed look.
7) Last and most importantly, Take your favorite concealer that is at least a shade lighter than your foundation and a flat synthetic brush to clean up any lines or messes you made around you brows. this is what makes them look precise and it makes your lines clean and perfect.
There you have it. This is my current brow routine. If you have any questions, requests or suggestions feel free to comment below.
Til then...Glow on, Beauties!!
Saturday, April 6, 2013
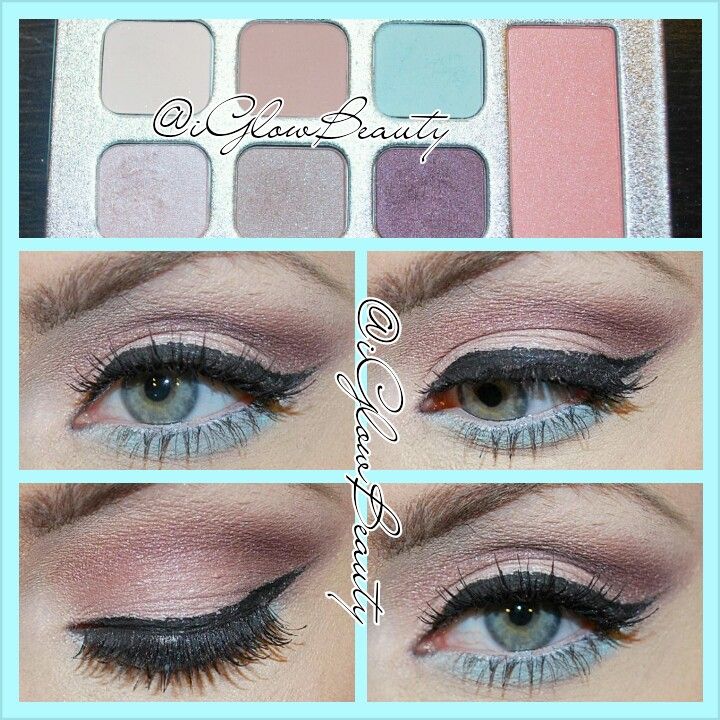
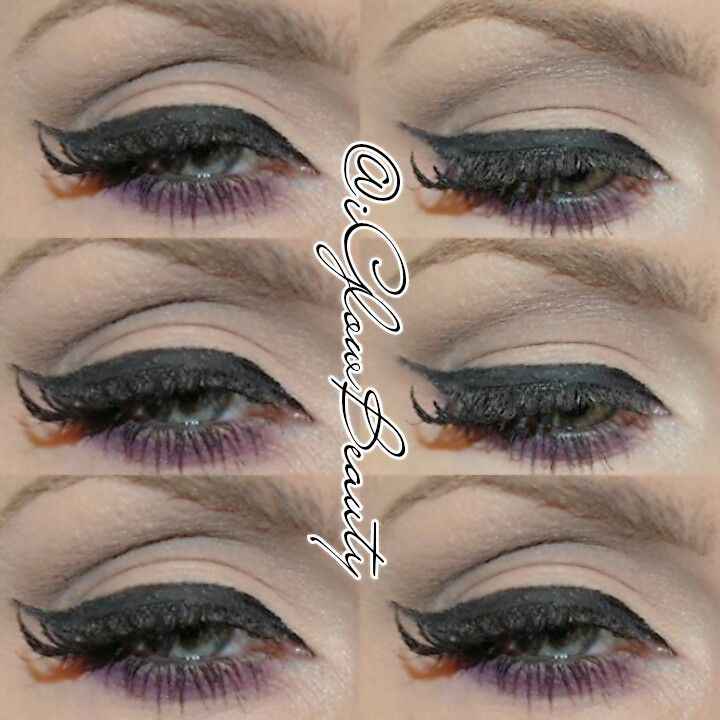
Spring Trends 2013
Bright, Bold, Beautiful Colors

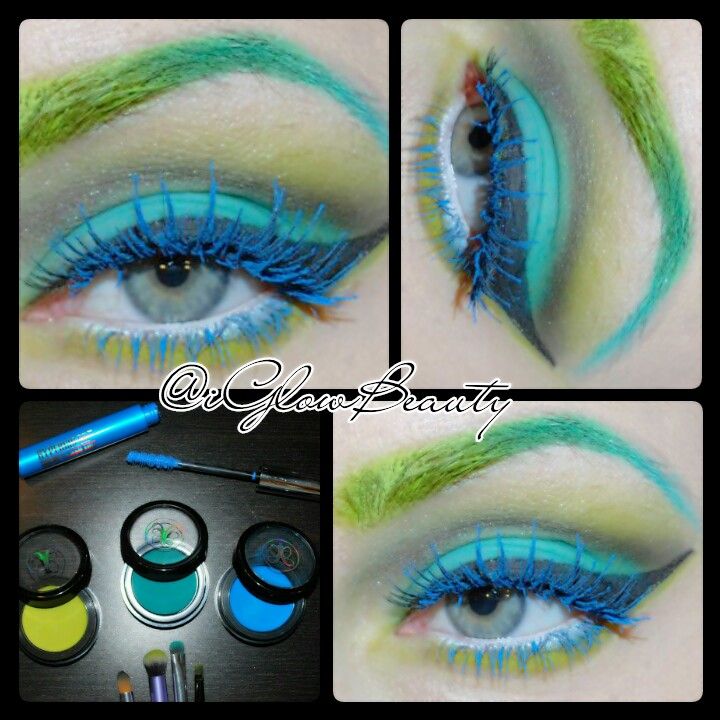
If you are into a bolder look, I used all Anastasia products for this look. I used all three hyper colors pictured in my brows starting from lightest to darkest for the popular ombre effect. With a blending brush I applied Mega Watt Green as a transition color between my crease and brow bone and on my lower lash line. Then with a shadow brush I packed on Teal Tornado to my lid. I used a regular matte black shadow and pencil brush in my crease. Finished the look with my favorite liner, lashes and then loaded on the hypercolor lash tint in Electric Blue.

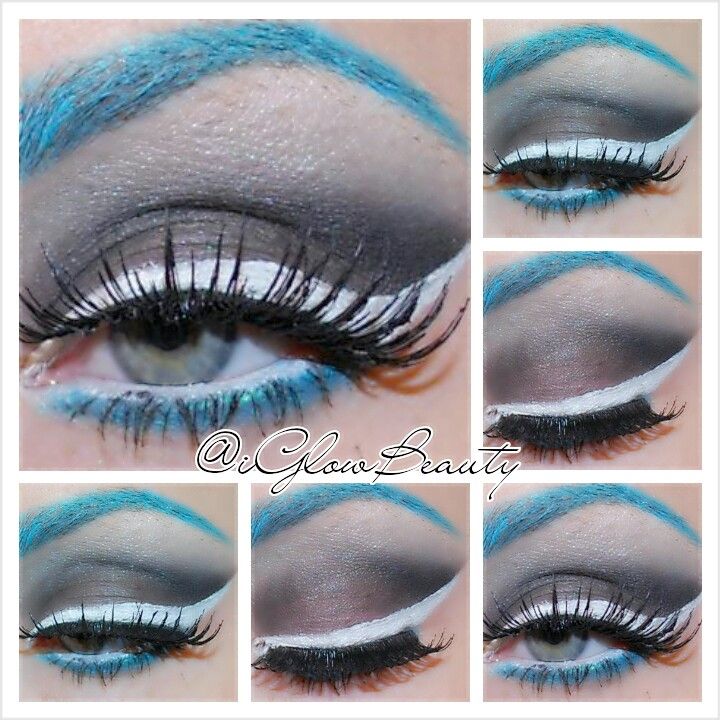
One more thing I am obsessing over right now is White eyeliner. It goes perfectly with all of these bright vivid colors, and looks so neat and unique. There are a few white liners out there, I have used Palladio Liquid Liner in "RockStar" and Inglots gel liner in number 73. I definitely prefer Ingolts gel liner because it is much easier and neater to apply. It has a matte finish and feels so soft and creamy. I highly recommend it.
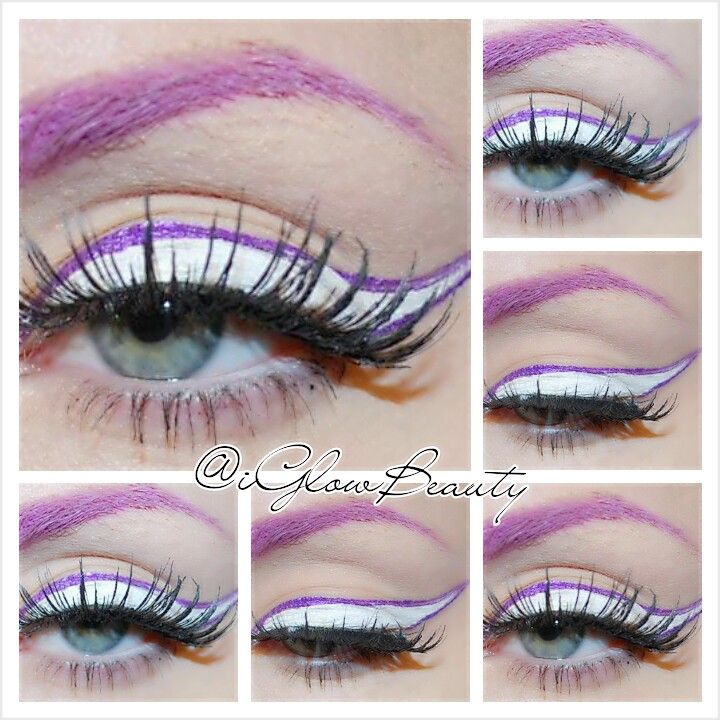
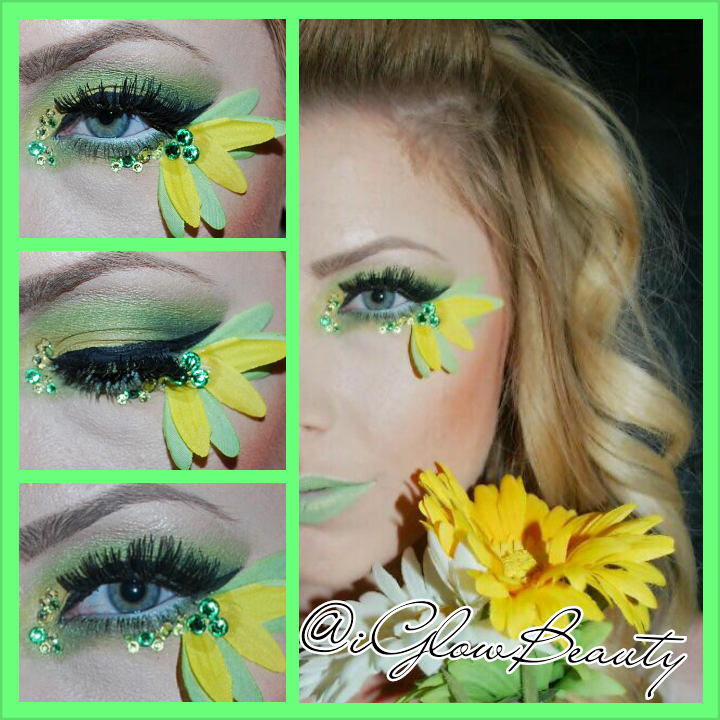
Well this concludes today's post of my favorite Spring Trends. Have fun and experiment with colors! After all, its only makeup!! Here's one more look I did, inspired by spring flowers. Just for fun...
Glow on, Beauties!
xox
Thursday, April 4, 2013
Allow me to introduce myself...
So it's official. I am now a "beauty blogger". This blog will be anything from reviews, to how to's, to tutorials and pictorials. Now, let me begin by telling you a bit about myself.
My name is Tawni and I live in Orange County CA. First and foremost I am a mommy to a wonderful little toddler. I own my own sunless tanning company. iGlow Sunless Bronzing located in Costa Mesa CA. www.iglowsunlessbronzing.com
I also am a self taught freelance makeup artist who LOVES airbrush makeup!!
I guess to start with, that's all I have to say. I will be posting some pictorials soon and how to's. So be on the lookout for those. I also do fun giveaways and contests. If you love makeup then subscribe and tell your girlfriends too! Thank you for all of the love and support!
Glow on, beauties!!
Tawni
Subscribe to:
Posts (Atom)